

Option 1: Adding star information back into "tonemapped" images.
This workflow re-introduces the stars back into a tonemapped image in which the stars had previously been removed. For this method to work each channel (SII, Ha, OIII) must be carefully stretched in exactly the same way.
For this workflow I will be using an image of IC5070 and Photoshop CS3.
1. Open master SII/Ha/OIII calibrated and registered frames. Duplicate the images in order to save the originals
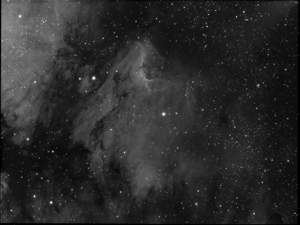
2. Lightly stretch the Ha image using curves/levels. A guide here would be to aim for ½ or less of the full stretching you intend to do. Do the exact same stretching for the SII and OIII frames. (You may want to record a Photoshop “action” while you stretch the Ha, in order to exactly replicate the stretching for all channels). The idea here is to bring out some stars but not over-saturate.
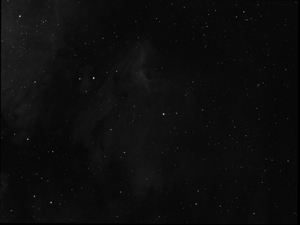
Ha image stretched to 1/2 maximum
3. Use levels to match the black points of the Ha/SII/OIII images. Note: I try to match the "K" value of the black point (in the histogram palette under "Info") rather than just align the slope of the histogram. In many cases I have found that this more accurately matches the background black points of the images.
4. Save each image. Duplicate the images and close the originals.
5. Remove most of the stars. I run JP Metsavainio's Photoshop action to remove most of the stars and reduce the brighter stars. The action can be found here:
StarRemovingJPM.atnWhile this action does most of the work, I typically run the Dust and Scratches filter (radius=5, threshold=3) one more time to further reduce any leftover stars or artifacts.
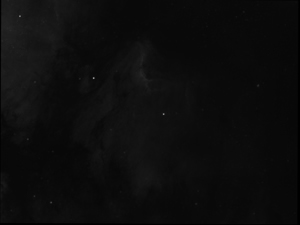
Ha image stars removed
6. Using Levels, lightly stretch all three images. Be careful to stretch each image exactly the same. Starting with the Ha image, bring the white levels slider down from 255 to 150. Lightly stretch the image again as needed. I typically will stretch one additional time, bring the white point down from 255 to 175. Stretch gently; aggressive stretching will result in too much noise.
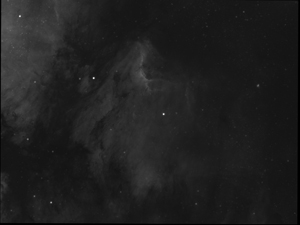
Ha tonemap image
7. Use levels to match the black points of the Ha/SII/OIII images.
8. Paste the original images from steps 1-3 above on top of the tonemap Ha/SII/OIII images. Set the blend mode to "screen." This adds the stars back into the tonemap image, and also lightens the image further.
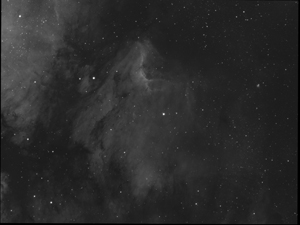
Ha tonemap image with stars added back in
9. Flatten the images, match the black points and save the Ha/SII/OIII tonemap images.
10. Assemble a hubble palette image from the Ha/SII/OIII tonemap images (R=SII, G=Ha, B=OIII). Duplicate the SII tonemap image. Copy the Ha on top of the SII, and copy the OIII on top of the Ha. Change the image mode to “RGB Color” (Image/Mode). Create Hue/Saturation, Curves and Levels adjustment layers on top of the SII/Ha/OIII layers. (Save time by using the ESO/NASA fits-liberator action “Color Composite” to create these adjustment layers. The action can be downloaded here:
ColourComposite.atn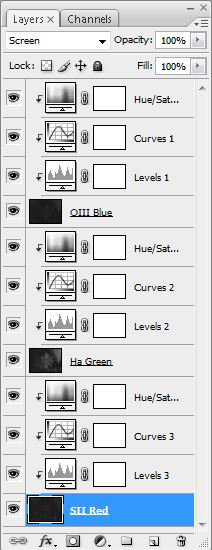
Hubble palette image layers
(click for larger version)
11. Using the curves and levels adjustment layer for the R and B layers, stretch the R and B channels so that the histograms approximately match the G channel's histogram, but do this gently. The histograms will never match but you can get it close.
12. Flatten the image. Duplicate the base layer and adjust the color scheme to your liking. I generally start with the "Gold/Turquois" color scheme as described by Bob Franke, and then make custom adjustments to the color from there:
13. Most likely the stars and perhaps even some of the nebula will be magenta. Open the "Selective Color" adjustment, choose the "magentas" from the list and reduce the magenta, while increasing the cyan.
14. Save the RGB Image.
15. Open the original ½ stretched Ha image. Duplicate the image and close the original. Create a “master luminosity” as described by JP Metsavainio in his “Tonemap” method. (Step II in the Tonemap powerpoint presentation). Since this is a luminosity image, fully process the image as you would like (sharpen, reduce noise, reduce stars etc).
Master Luminosity
16. Save the master luminosity image, paste it on top of the RGB image and set the blend mode to "luminosity." Flatten the image, save it as a new file and process the image to your liking.

